
How to Screenshot on iPhone and iPad
Taking real-time screenshots on smartphones has become incredibly straightforward. Whether using the device's built-in screenshot feature or installing an application, capturing screen images or screenshot is now simple and hassle-free.
However, this method may not be common knowledge to everyone, particularly new iPhone users who might struggle finding the screenshot feature.
Don't worry! In this article, we will guide you on how to take iPhone or iPad screenshots with ease, so that you will never miss those important moments.
Our team at Carisinyal will deliver insights on how to effectively take a screenshot on both iPhone and iPad. So, let's dive into the comprehensive information right away!
How to Screenshot on iPhone New Series
Taking screenshots on the latest iPhone series is a piece of cake with Apple's intuitive methods. Here are three simple and effective ways to take a screenshot on your iPhone. Check them all out here!
1. Using Physical Buttons
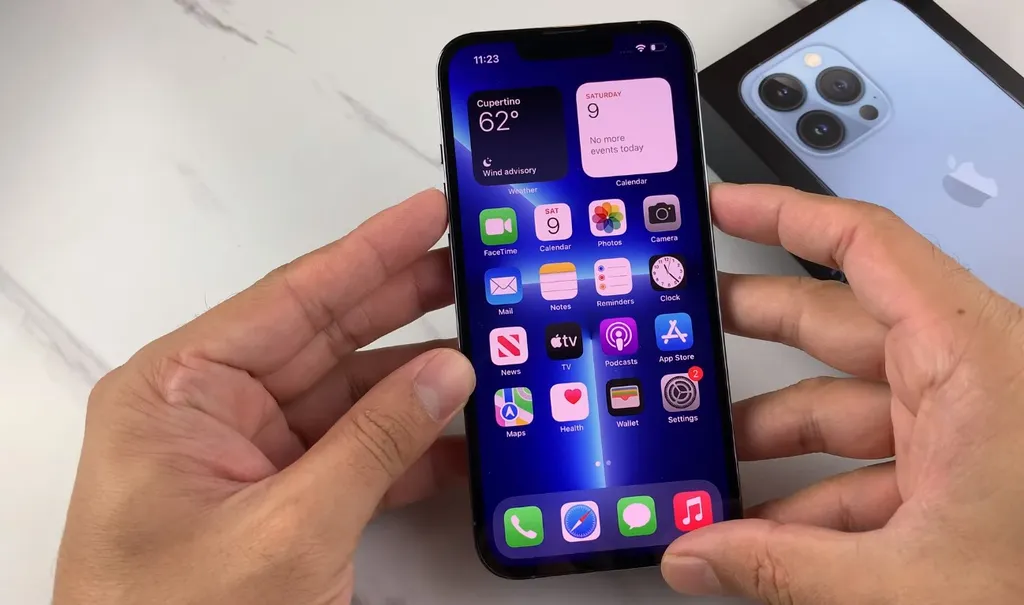
- The first method to take a screenshot on your iPhone is similar to the process on an Android phone. Locate the content you want to capture. Press and hold simultaneously the power button and volume up button located on the side of your device.
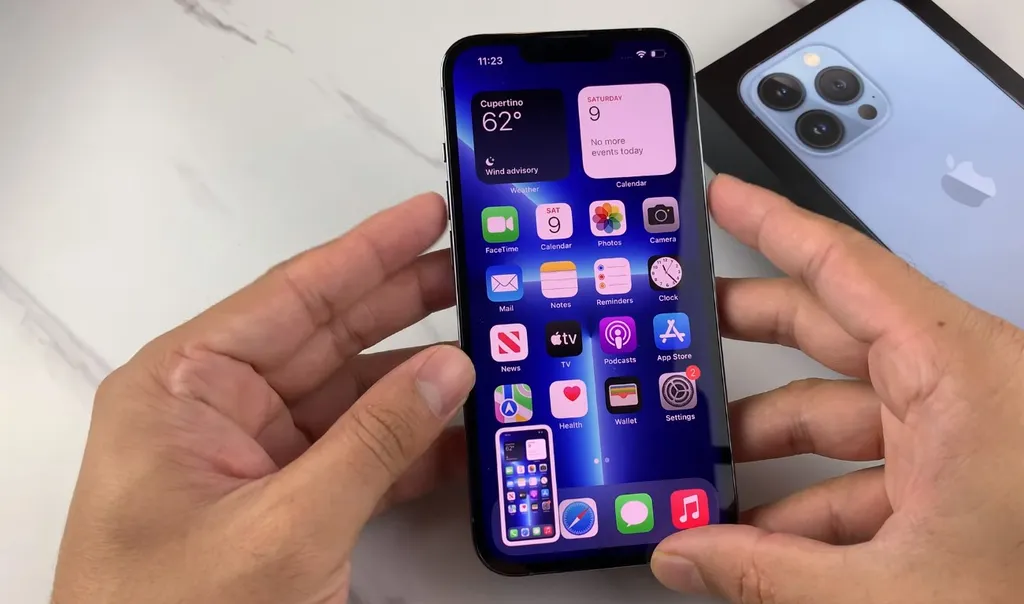
- Keep holding both buttons for a few moments until you see a flash of light on the screen or hear the camera shutter sound. This indicates that a screenshot has been successfully taken.
- Do not release both buttons until the screen flash. If there's no flash, it indicates that the screenshot wasn't successful, or perhaps the buttons on your phone weren't pressed correctly.
If the process is successful, you will find a screenshot mini image in the bottom left corner of the screen. This thumbnail will disappear automatically.
2. Tapping the Back of the iPhone
If the previous method seems difficult, you can use an alternative way to take a screenshot on iPhone by tapping the back of the device.
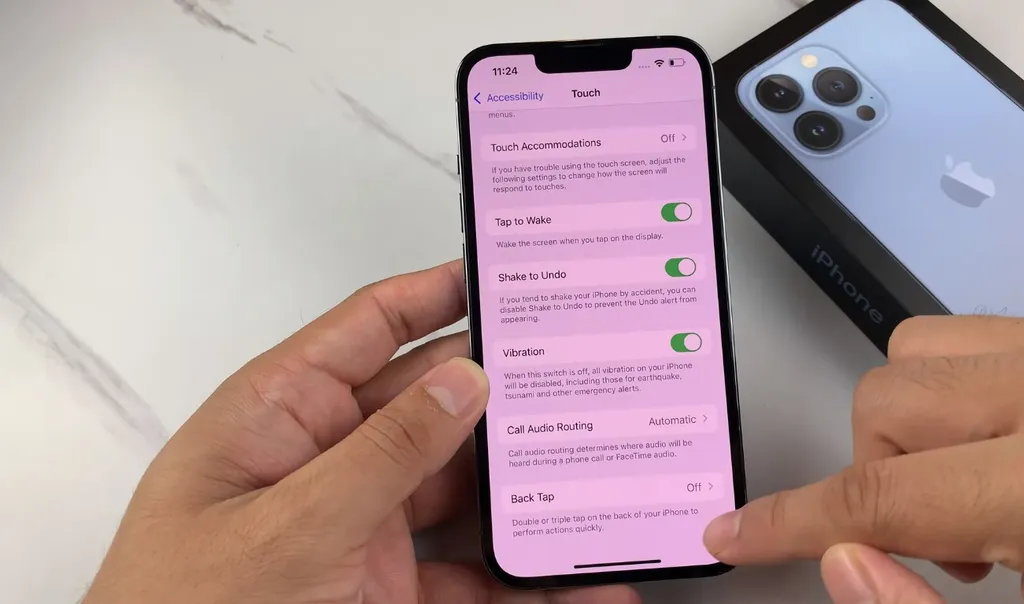
- Open iPhone settings and navigate to Accessibility > Touch > Tap Back.
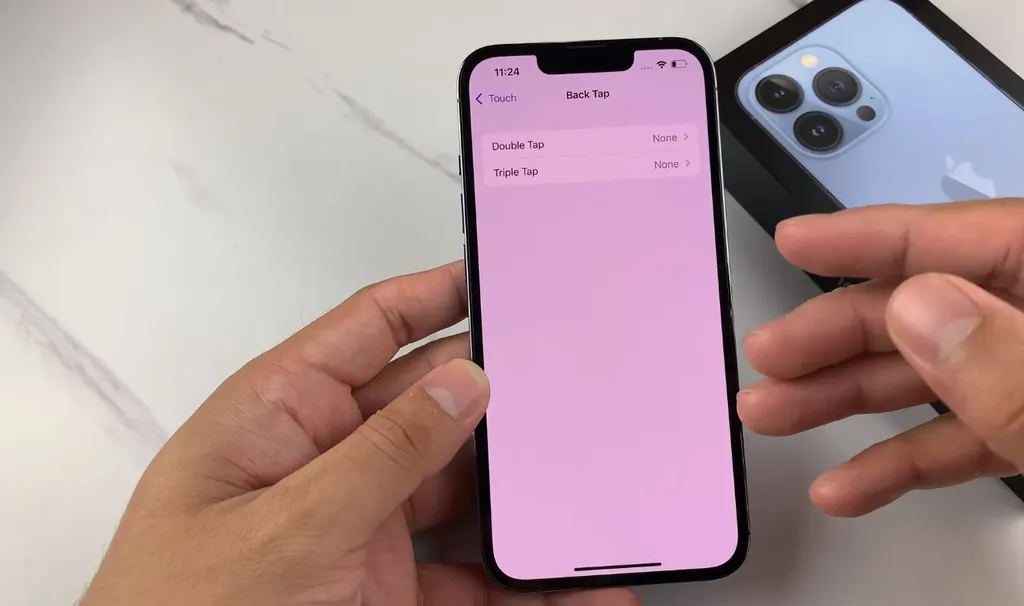
- Under Tap Back, you will find options for "Two Taps" or "Three Taps." Select the option you want to take a screenshot.
- Using this method is very easy. Just double or triple tap on the back of your iPhone. The device will automatically capture and save the current screen to the Photos app.
To view the screenshot, open the Photos app and navigate to the Screenshots album. You will find the captured screenshot saved there.
3. Taking a Screenshot with AssistiveTouch
This method is available on newer iPhone models, such as the iPhone 14 series, but can also be used on older iPhone models. This method is a popular choice among users due to its simplicity and no need to press a physical button.
Before taking a screenshot using this method, make sure you enable the AssistiveTouch feature in your phone settings.
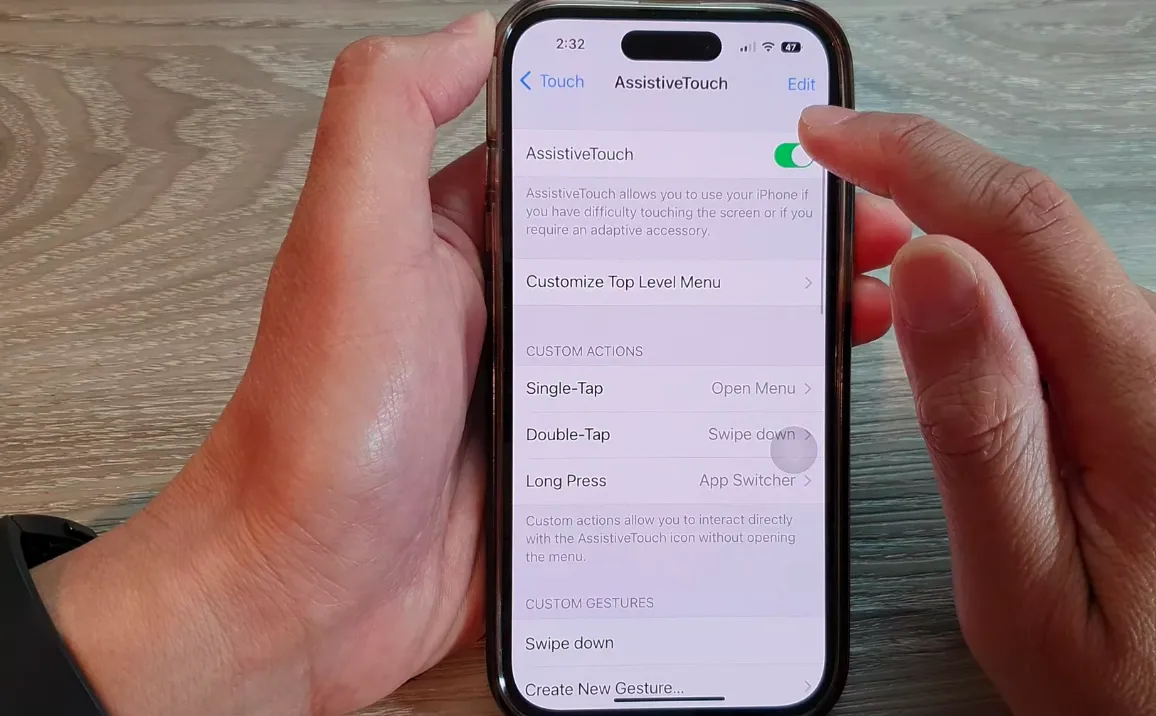
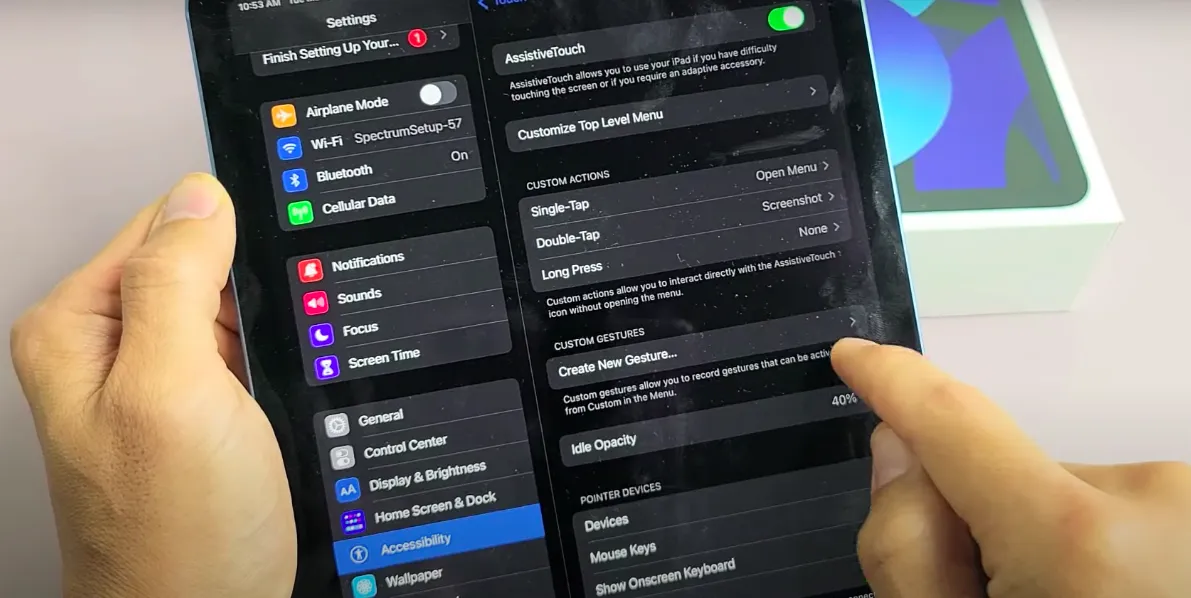
- The first step is to enable the Assistive Touch feature.
- Go to Settings, then go to Accessibility > Touch > Assistive Touch.
- Activate the Assistive Touch section by turning it on.
- Once enabled, a small circular icon will appear on your screen, which can be moved to your desired location.

- To take a screenshot, simply tap "AssistiveTouch" or the small circular icon. Then, select the "Device" menu.
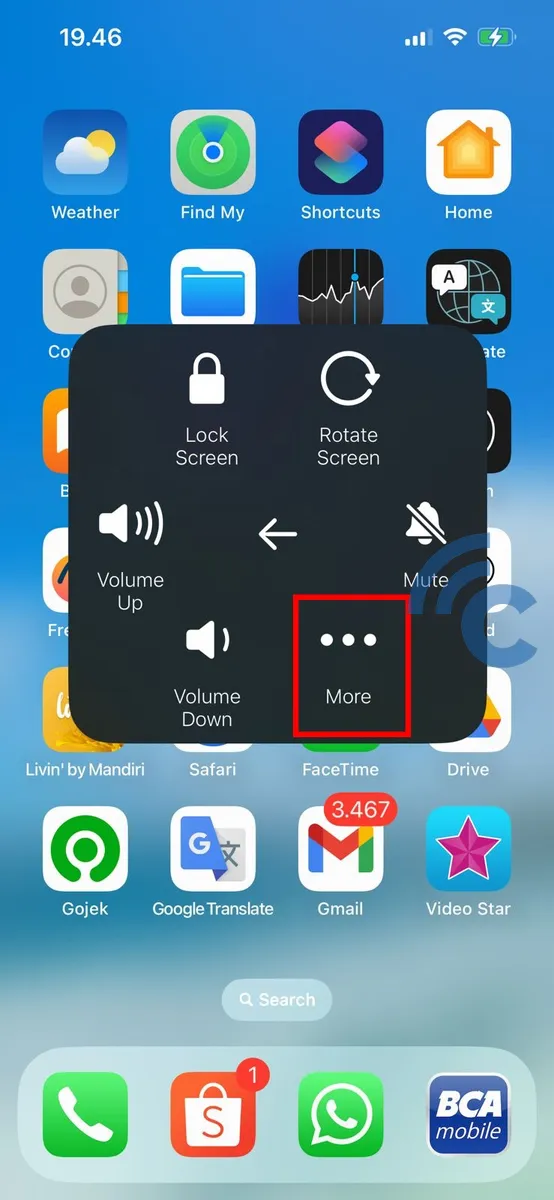
- On the Devices menu, tap the three-dot icon or "More", as shown in the image.
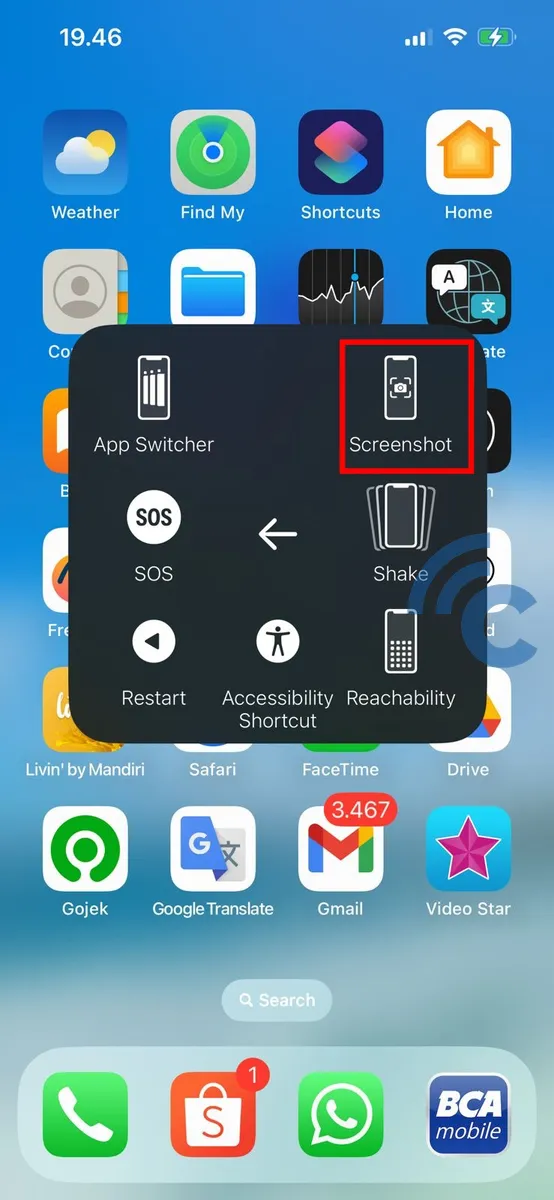
- From the options that appear, select "Screenshot".
- If the screenshot is successful, your phone may vibrate or make a camera shutter sound.
- The captured screenshot will be automatically saved in the Photos app in the Screenshots album.
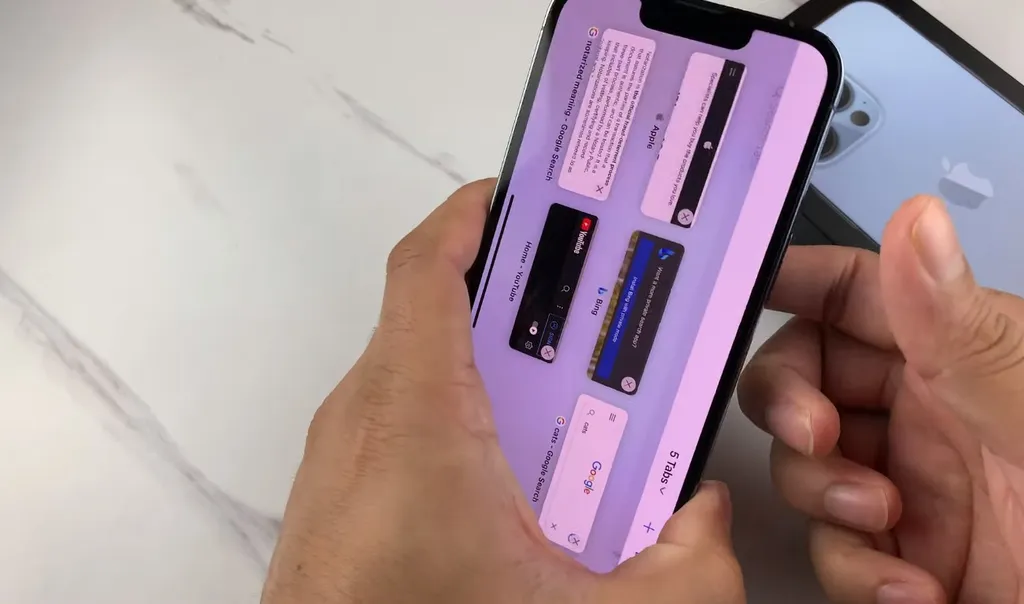
4. Capturing Long Screenshots on iPhone
In addition to the standard screenshot methods already discussed, the iPhone also provides a feature that allows you to capture extended, or "long", screenshots. This enables you to capture an entire page, from top to bottom, within a single screenshot. However, it's crucial to understand that these long screenshots are saved as PDF files rather than typical image files.
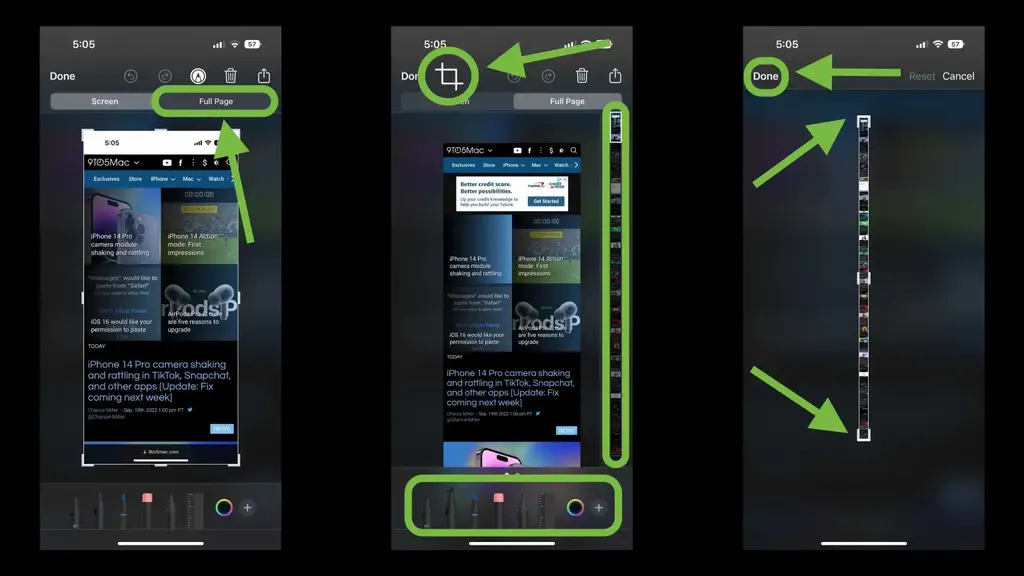
To begin, capture a screenshot using one of the regular methods. Once the screenshot is successful and a thumbnail appears at the screen's corner, tap the thumbnail to initiate the preview.
Within the preview window, tap on the image and select the "Full Page" option from the dropdown menu. Upon selecting "Full Page," you'll be presented with options to either share or save your extended screenshot. Hit the share button to distribute it, or tap the save button to store it in your desired folder.
Keep in mind that these long screenshots get saved as PDF files. To access them, you'll need to navigate through your file manager. By adhering to these steps, you can effortlessly capture and store long screenshots on your iPhone, offering a complete view of the entire page.
How to Screenshot on Ipad
The process of capturing a screenshot on an iPad is as straightforward as doing so on an iPhone. This technique applies not only to the latest iPad models but also to the older series of iPads. Follow the steps below to successfully take a screenshot on your iPad.
1. Taking Screenshot Using the Volume and Power Buttons
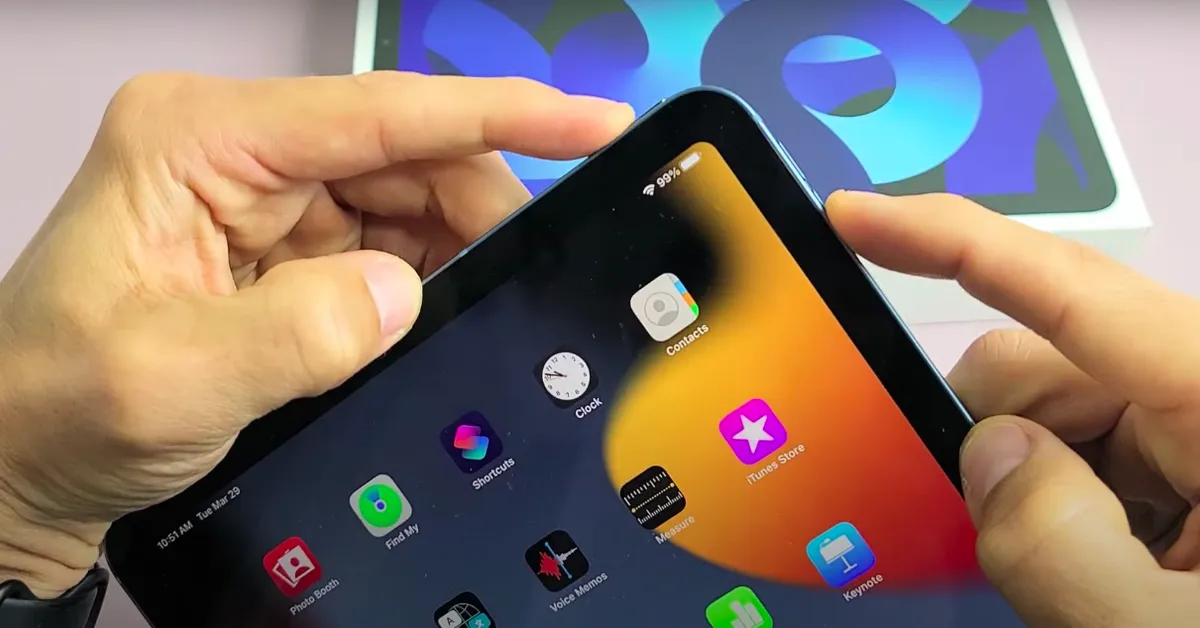
This method, similar to Android tablets, works for both old and new series of iPads. Begin by selecting the content you wish to save, ensuring it is displayed on your iPad screen. Simultaneously press and hold the power button and the volume up button, both located on the side of your device.
Continue to hold both buttons for about 2 seconds until you see a brief flashing screen or hear the camera shutter sound. If done correctly, you will see a mini window displaying the screenshot image. The mini window may appear in the lower left corner or upper right corner of the screen. The mini window will disappear automatically.
2. Taking Screenshot Using the Home Button
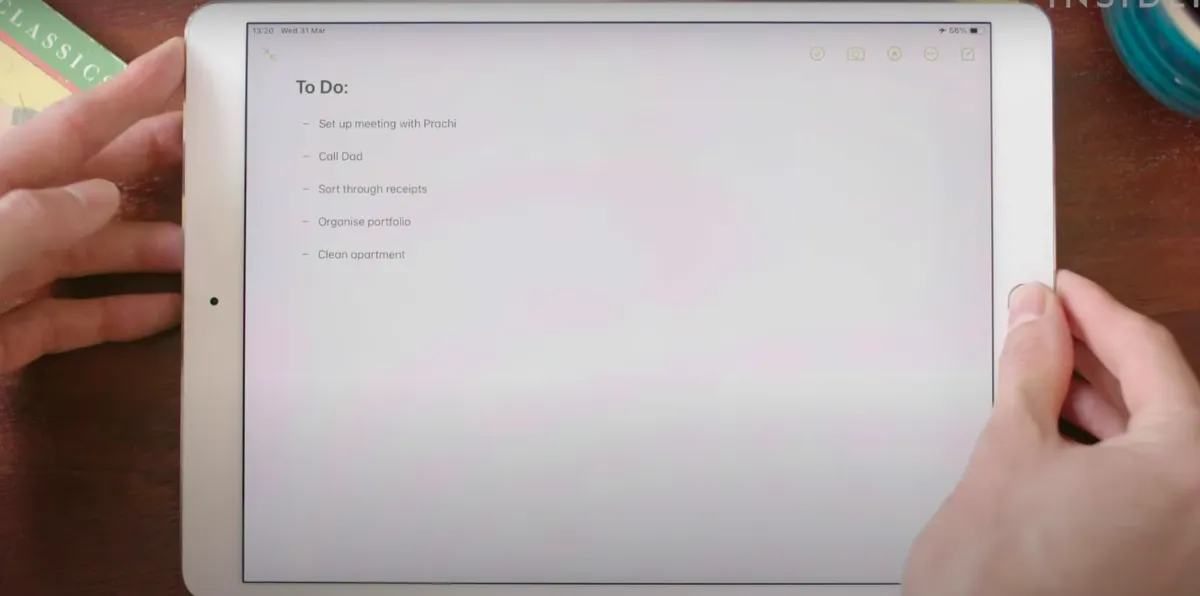
If you are using an older generation iPad, you can effortlessly take a screenshot by utilizing the home button. First, find the screen content you want to capture on your iPad. Simultaneously press and hold the home button and the power button (also known as the screen on/off button).
If performed correctly, the screen will flash for a second, and a small window will appear showing the screenshot image. The captured screenshot will be automatically saved to the Photos app. However, due to the larger size of the iPad, the button-based screenshot method may be less convenient compared to other methods.
3. How to Take Long Screenshots

In addition to the conventional screenshot methods outlined earlier, the iPad also comes with a feature for capturing long screenshots. This way, you can capture the entire page, from top to bottom, in a single screenshot. Unfortunately, the result of a long screenshot is saved as a PDF file instead of a standard image.
Take a screenshot using one of the commonly used methods. Once the screenshot is successful and a thumbnail pops up in the corner of the screen, tap the thumbnail to open the preview. Within the preview window, tap the image and select the "Full Page" option from the available menu.
After selecting "Full Page," you will be presented with options to either share the long screenshot or save it. By tapping the share button, you can distribute the screenshot, or by tapping the save button, you can store it for future use.
4. Taking Screenshot with AssistiveTouch
This method is available on various iPad series, from iPad Mini to iPad Pro. It is a popular choice due to its simplicity and no need to press physical buttons. However, before using this method, you need to enable the AssistiveTouch feature in your iPad settings. Let's check this out.
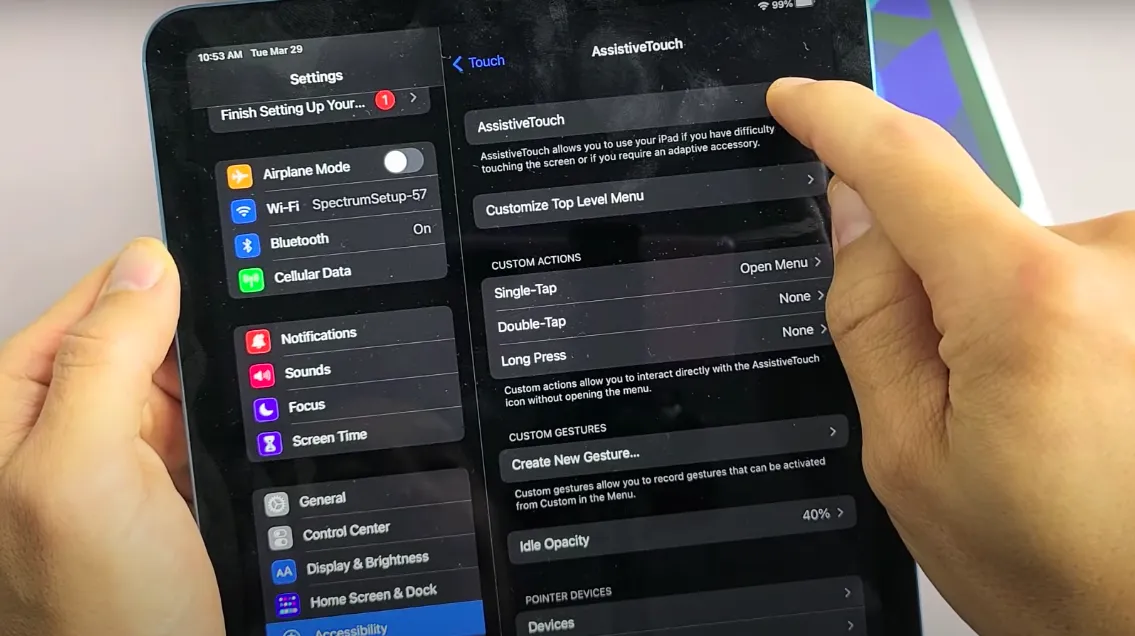
- Open the iPhone Settings app and navigate to Accessibility > Touch > AssistiveTouch. Enable the "AssistiveTouch" option.
- Once enabled, a box with a small circular icon will appear on your screen. You can freely move it to your desired location. Enter the "Custom Actions" section to customize the function according to your preferences. For example, you can set a double-tap action to perform a screenshot.
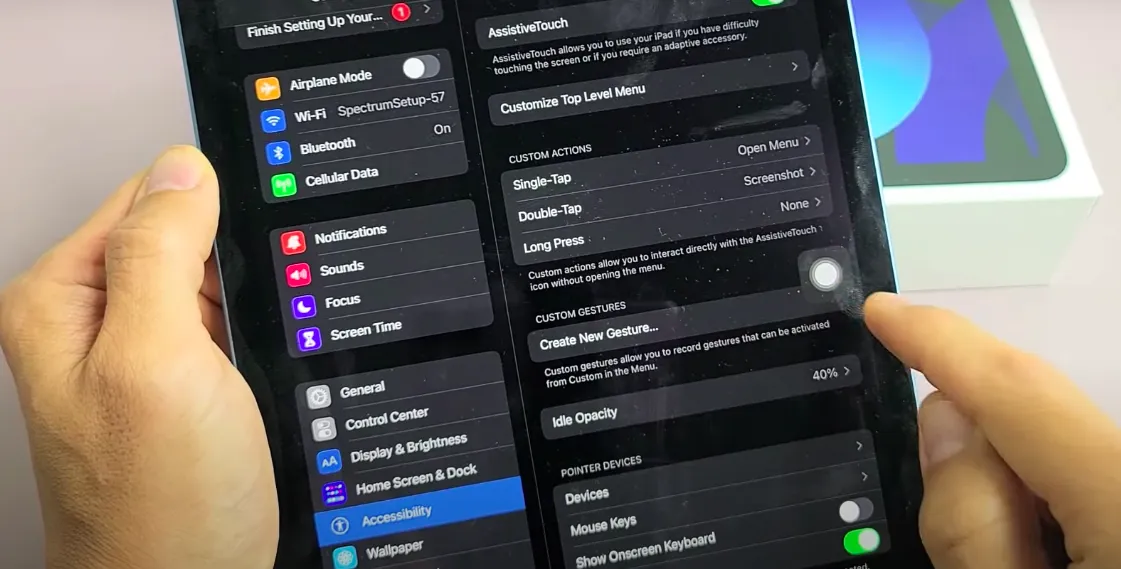
- To take a screenshot, simply tap the AssistiveTouch icon twice.
Another way to utilize the "Assistive Touch" feature is as follows. The activation steps are almost the same as the previous method.
To take a screenshot using this alternative method, tap the AssistiveTouch icon until the menu appears. From the menu options, select Device > More > Screenshot. Then, click on the screenshot icon to start the screen capture process.
5. Taking Screenshot Using an Apple Pencil
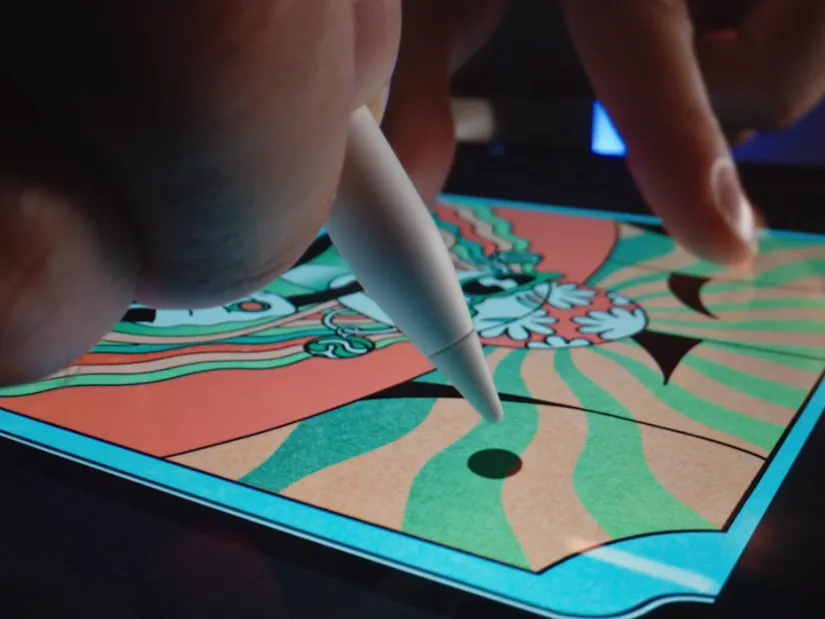
As mentioned earlier, the iPad offers various accessories to enhance its functionality. One accessory that comes in handy is the Apple Pencil. The Apple Pencil is primarily designed to facilitate tasks like drawing and editing documents. However, you can also use the Apple Pencil to take screenshots on your iPad. For a detailed explanation, follow the steps below:
- Display the webpage or content you want to save on iPad.
- Navigate Apple Pencil in the bottom left corner of the iPad screen.
- Swipe or move the pencil diagonally towards the center of the screen. If successful, the screen will flash briefly, indicating that a screenshot has been successfully taken.
6. Taking Screenshot Using the Keyboard
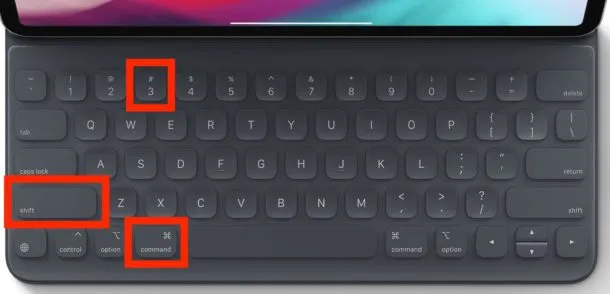
Besides the Apple Pencil accessory, the iPad also supports a physical keyboard accessory, significantly enhancing the typing experience on the device. Interestingly, this keyboard allows you to use certain key combinations to capture screenshots on your iPad.
First, display the webpage or content you wish to capture on your iPad. Simultaneously press the "Command", "Shift", and the number 3 keys. If executed correctly, a brief flash of the screen indicates a successful screenshot.
Furthermore, you can also press the "Command" key, the "Shift" key, and the number 4 key at the same time to capture a screenshot. The advantage of this method is that you can access the mark-up editor section.
The above explanation details how to capture screenshots on various iPhone and iPad models, which may be unfamiliar to some users.
If you choose not to use the built-in screenshot functionality of your smartphone, you have the alternative of installing a screenshot app from the App Store. Some popular examples of such apps include Picsew, Tailor, and others.