
5 Easy Ways to Access the On-Screen Keyboard on Laptops
Virtual keyboards are an integral component of modern touchscreen devices like smartphones and tablets. Hybrid laptops, which blend the functionalities of both laptops and tablets, also necessitate a virtual keyboard, especially when used in tablet mode.
Generally, a virtual keyboard is software-based, enabling users to type characters without a physical keyboard. This digital keyboard is often a built-in feature of the device's operating system, though users have the option to install third-party virtual keyboard applications as well.

But what about those using non-touchscreen computers or laptops? Can they access a virtual keyboard? Absolutely! In fact, most operating systems, including Windows, come with their own version of a virtual keyboard.
In Windows, it’s known as the On-Screen Keyboard. This feature is particularly crucial for regular computer users as it serves as a valuable alternative in case of physical keyboard malfunctions or damage.
Benefits of the On-Screen Keyboard
The On-Screen Keyboard, or a virtual keyboard in general, is undeniably beneficial for users of touchscreen devices such as hybrid laptops and tablets. But is this digital keyboard equally necessary for users of non-touchscreen laptops and PCs? Absolutely, especially when encountering issues with a physical keyboard.
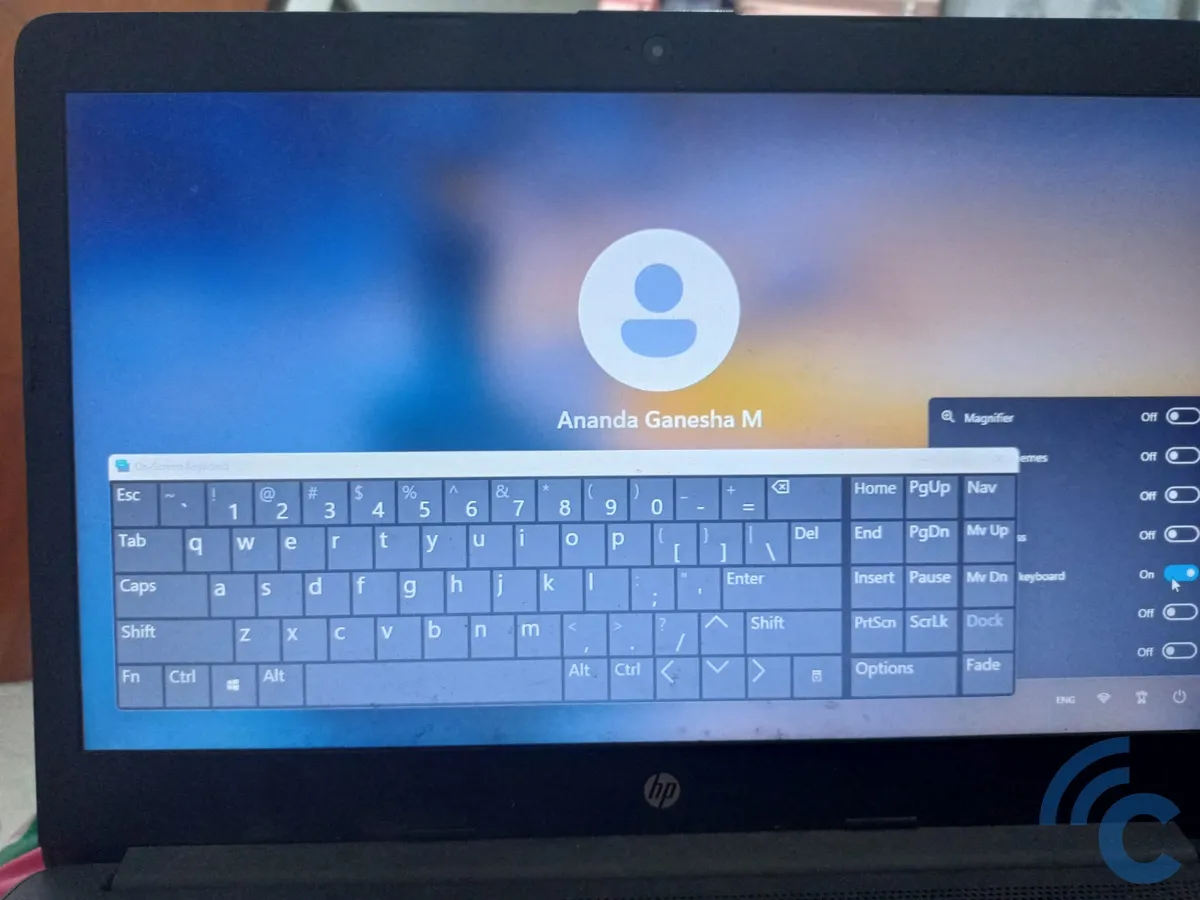
Consider a scenario where you need to log into your computer but your laptop’s physical keyboard is malfunctioning — perhaps some keys are not working. In such instances, the On-Screen Keyboard becomes an invaluable tool, allowing you to enter your password and gain access to your computer.
But how do you activate the On-Screen Keyboard on the sign-in screen? It's quite straightforward. Simply click on the 'Ease of Access' icon, which is typically present by default on the computer's login page. Within the range of assistance options provided, one of them is the On-Screen Keyboard. A single click on this option will open the virtual keyboard on your login screen.
However, it’s important to note that when using the On-Screen Keyboard on a non-touchscreen computer, you'll need to use a mouse to 'press' each key on the virtual keyboard.
How to Access the On-Screen Keyboard
Activating the On-Screen Keyboard on a Windows laptop can be done in a few simple steps. Here's how to do it:
1. Through Settings
The On-Screen Keyboard can easily be enabled via the computer's settings.
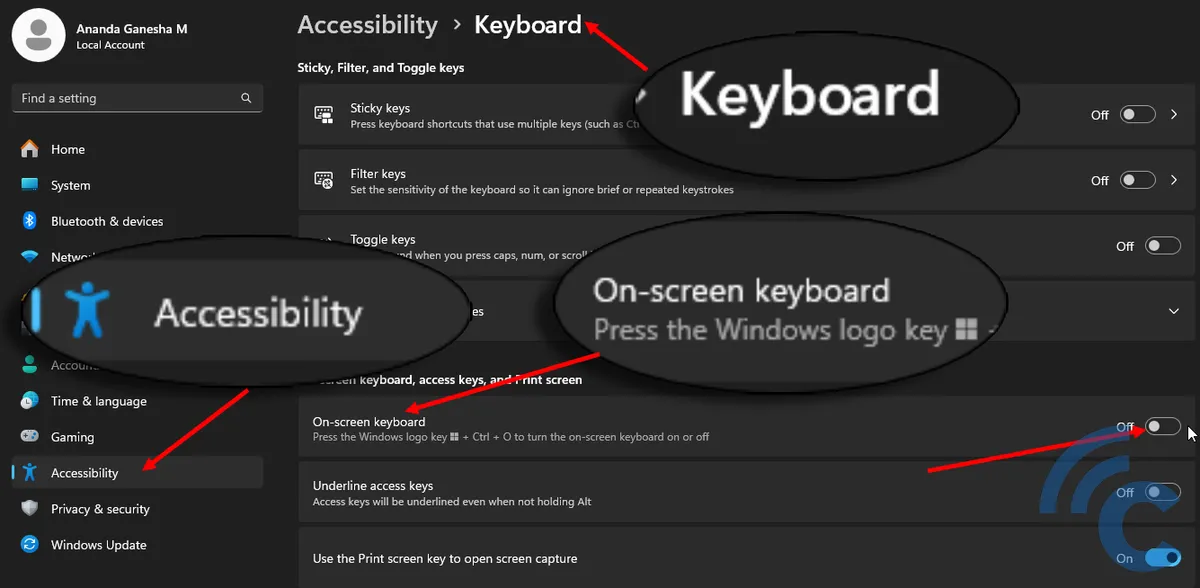
- Move your cursor to the bottom left of the screen and click the Windows icon to open the Start Menu.
- Navigate your pointer to the top and select
Settings > Accessibility > Keyboard. - In the Keyboard settings, you will find the option for the On-Screen Keyboard. Toggle the switch from 'Off' to 'On' to enable it.
Once these steps are completed, the On-Screen Keyboard will be activated and ready for use. This method is particularly user-friendly and doesn’t require navigating complex menus or configurations.
2. Through Control Panel
The second method to access the On-Screen Keyboard involves using the Control Panel, particularly through the Ease of Access Center. This method is slightly different but just as effective as the first. Follow these steps:
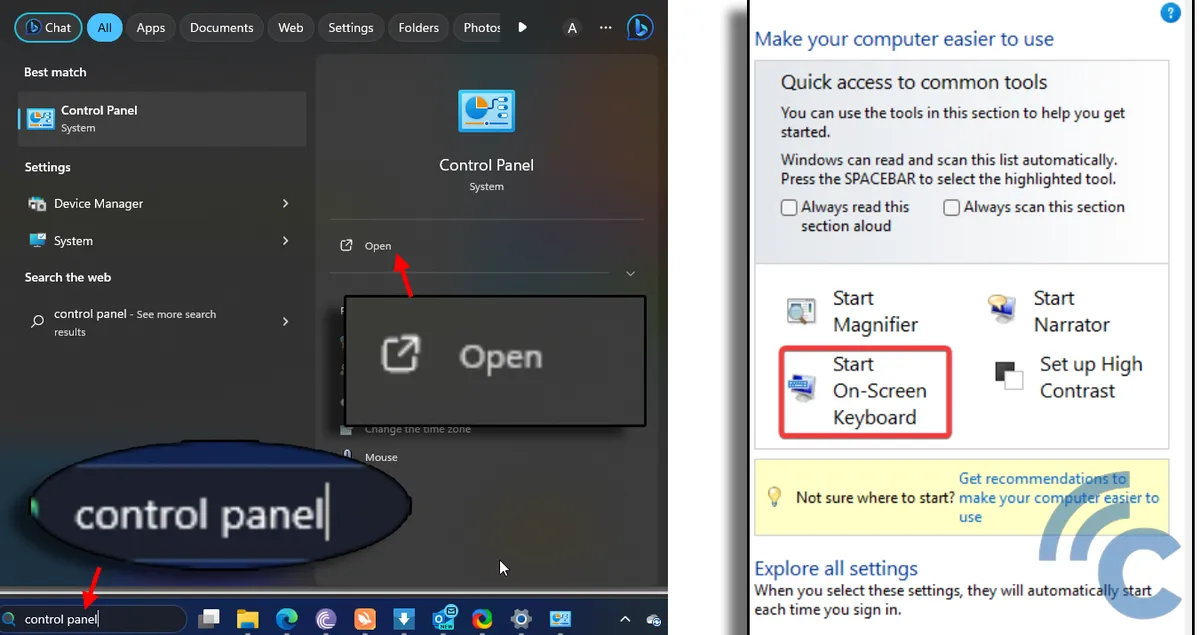
- Click on the search field and type "Control Panel", then click 'Open'.
- Select 'Ease of Access' and then choose 'Ease of Access Center'.
- Look for the 'Start On-Screen Keyboard' option in the quick access tools box and click it.
- Wait for a few moments, and the On-Screen Keyboard will appear on your screen.
- Once these steps are completed, the virtual keyboard is ready for use.
3. Through the Search Panel
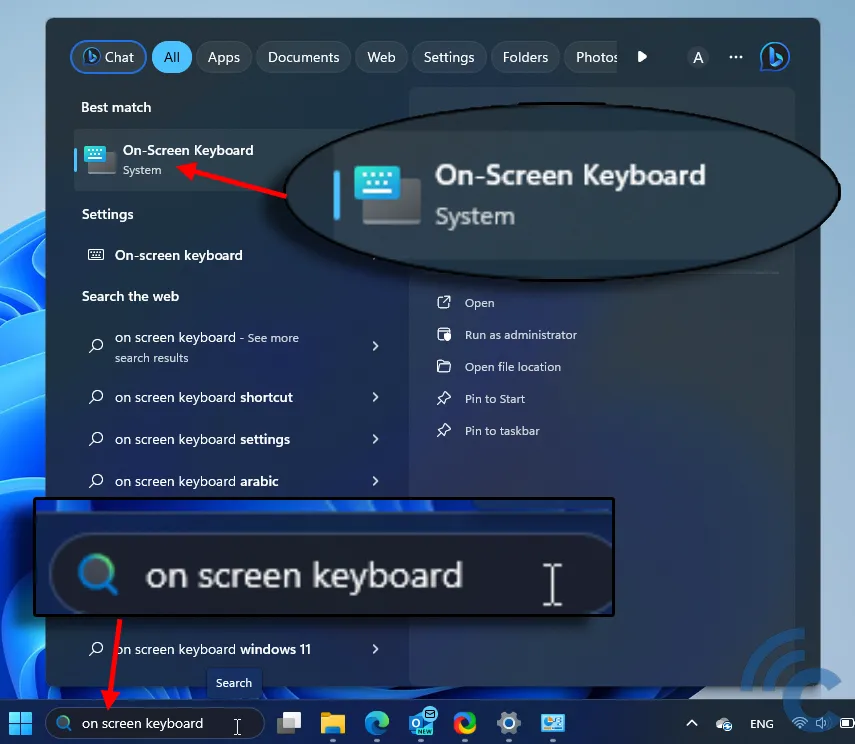
Windows 10 features a dedicated search panel located on the left side of the taskbar. Here's how:
- Click on the search icon (magnifying glass) on the taskbar.
- Type the words "On-Screen Keyboard". There's no need to press 'Enter', as the system will automatically display related search results.
- Once the results appear, you can activate the On-Screen Keyboard directly from there.
Additionally, you have the option to use voice commands to activate the On-Screen Keyboard, but this requires the Cortana feature to be activated beforehand. This method can be particularly useful for hands-free operation or for users with mobility challenges.
4. Through Windows Run
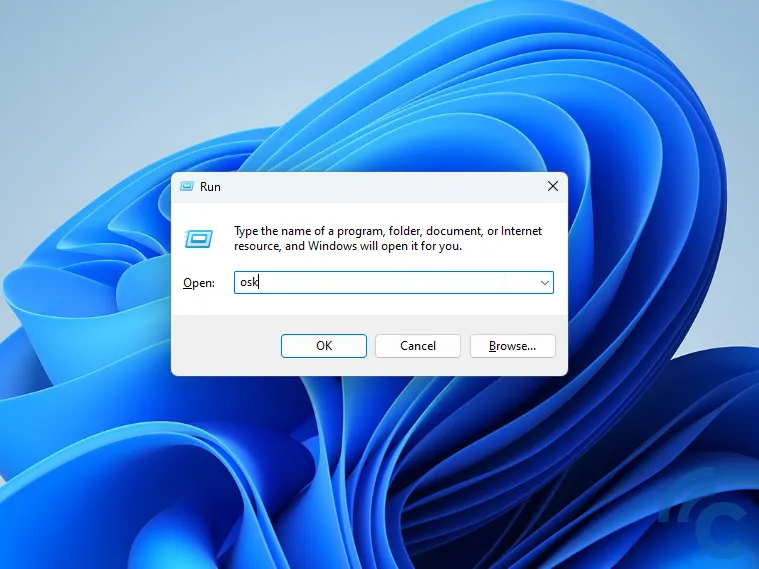
Using the Windows Run function is one of the quickest ways to activate the On-Screen Keyboard in Windows 10. Here's how to do it:
- Press the
Windows+Rkeys simultaneously on your keyboard. This will open the Run dialog box. - In the Run box, type "osk" (without quotes) and then press
OKorEnter. - Wait a brief moment, and the On-Screen Keyboard will appear on your screen.
5. Through Windows PowerShell
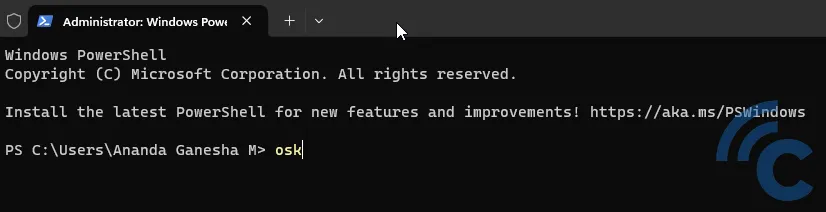
Activating the On-Screen Keyboard can also be done via Windows PowerShell, which is particularly useful for those who prefer using command-line interfaces. Follow these steps:
- Press
Windows+Xon your keyboard to open the quick access menu. - From the menu that appears, select 'Terminal (Admin)'. This will open Windows PowerShell with administrative privileges.
- In the PowerShell window, type the command "osk" and press
Enter. - The On-Screen Keyboard will then appear on your screen after a few moments.
Virtual Keyboard Applications for Windows
In addition to the built-in virtual keyboard, Windows users can opt for third-party virtual keyboard applications. These applications vary, offering both free and paid versions, with the paid ones typically providing more advanced features.
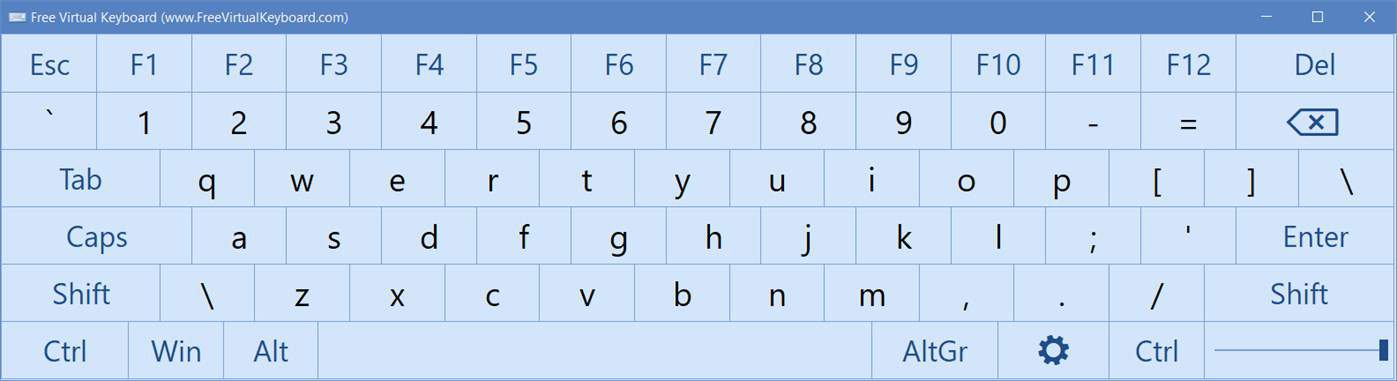
One notable free virtual keyboard application for Windows is "Free Virtual Keyboard." This application is not only free but also lightweight, multilingual, and designed to be finger-friendly.
It is versatile and provides user-friendly typing experience for users of Windows-based touchscreen computers. It's not just limited to touchscreens though; you can also interact with it using a mouse, pen, or other pointing devices. Its design, featuring large keys, makes it particularly convenient for fingertip typing.
This application provides four distinct virtual keyboard layouts and supports all language and keyboard layouts installed on the system. Among its notable features is the ability to customize the keyboard's appearance:
1. Customizable Size, Color, and Transparency
Users have the flexibility to modify the size, color, and transparency of the keyboard to fit their specific needs and preferences. In full-screen mode, the virtual keyboard is designed to automatically resize to match the screen's width. This feature ensures that the keyboard is functional and visually coherent in both landscape and portrait orientations.
2. Auto-Repeat Function
The Free Virtual Keyboard includes an auto-repeat feature, which is extremely useful for continuous typing of the same character. When you press and hold any key, it automatically repeats that character, simplifying tasks like long spaces or repeating characters.
3. Portability and Flash Drive Compatibility
One of the standout features of Free Virtual Keyboard is its portability. The application can be stored on a USB thumb drive and run directly from it, making it convenient for those who use multiple computers or need a virtual keyboard on the go.
The settings for the application are stored in the FreeVK.ini file, which is located in the program's installation folder. In cases where this isn't feasible, the settings are stored in the computer's registry.
For those interested in trying out the Free Virtual Keyboard, it can be downloaded from the application's official website or through the Microsoft App Store. The links for download are provided on the website.
In summary, for those needing a virtual keyboard on a Windows 10 laptop, there are several options available. You can use the built-in virtual keyboard, the Free Virtual Keyboard application, or explore other similar software available in the Microsoft App Store. Each option has unique features and conveniences, catering to different user needs and preferences.